

Megan's colors are yellow and gray, and I definitely knew I wanted to use yellow in the centerpieces somehow. I had seen a great pin on Pinterest with lemons lining a mason jar, and I loved it. We knew pretty much right away that's what we wanted to try . The problem however was there was no instructions or a tutorial anywhere on how to do it! The pin I found led to basically nowhere. And so we had to just wing it, and figure it out on our own! Well, it was a bit tricky, lemme yell ya. So I decided I was going to write my own little tutorial, and pin that to Pinterest for others!
So first of all, I want to say that I loved this idea because it's relatively inexpensive. I already had six mason jars just sitting around at home, so those were "free" for us to use for the shower. And the lemons really aren't too pricey either. We got three two-pound bags, which were about $3 a bag. Then we went to Publix to buy our fresh flowers, and got six bouquets, which were on sale, 3 for $12. (We then added one more $4 bouquet after they were all done.) So total, we spent only $37 to make six centerpieces. Obviously, if you don't need that many, it can be even way cheaper.
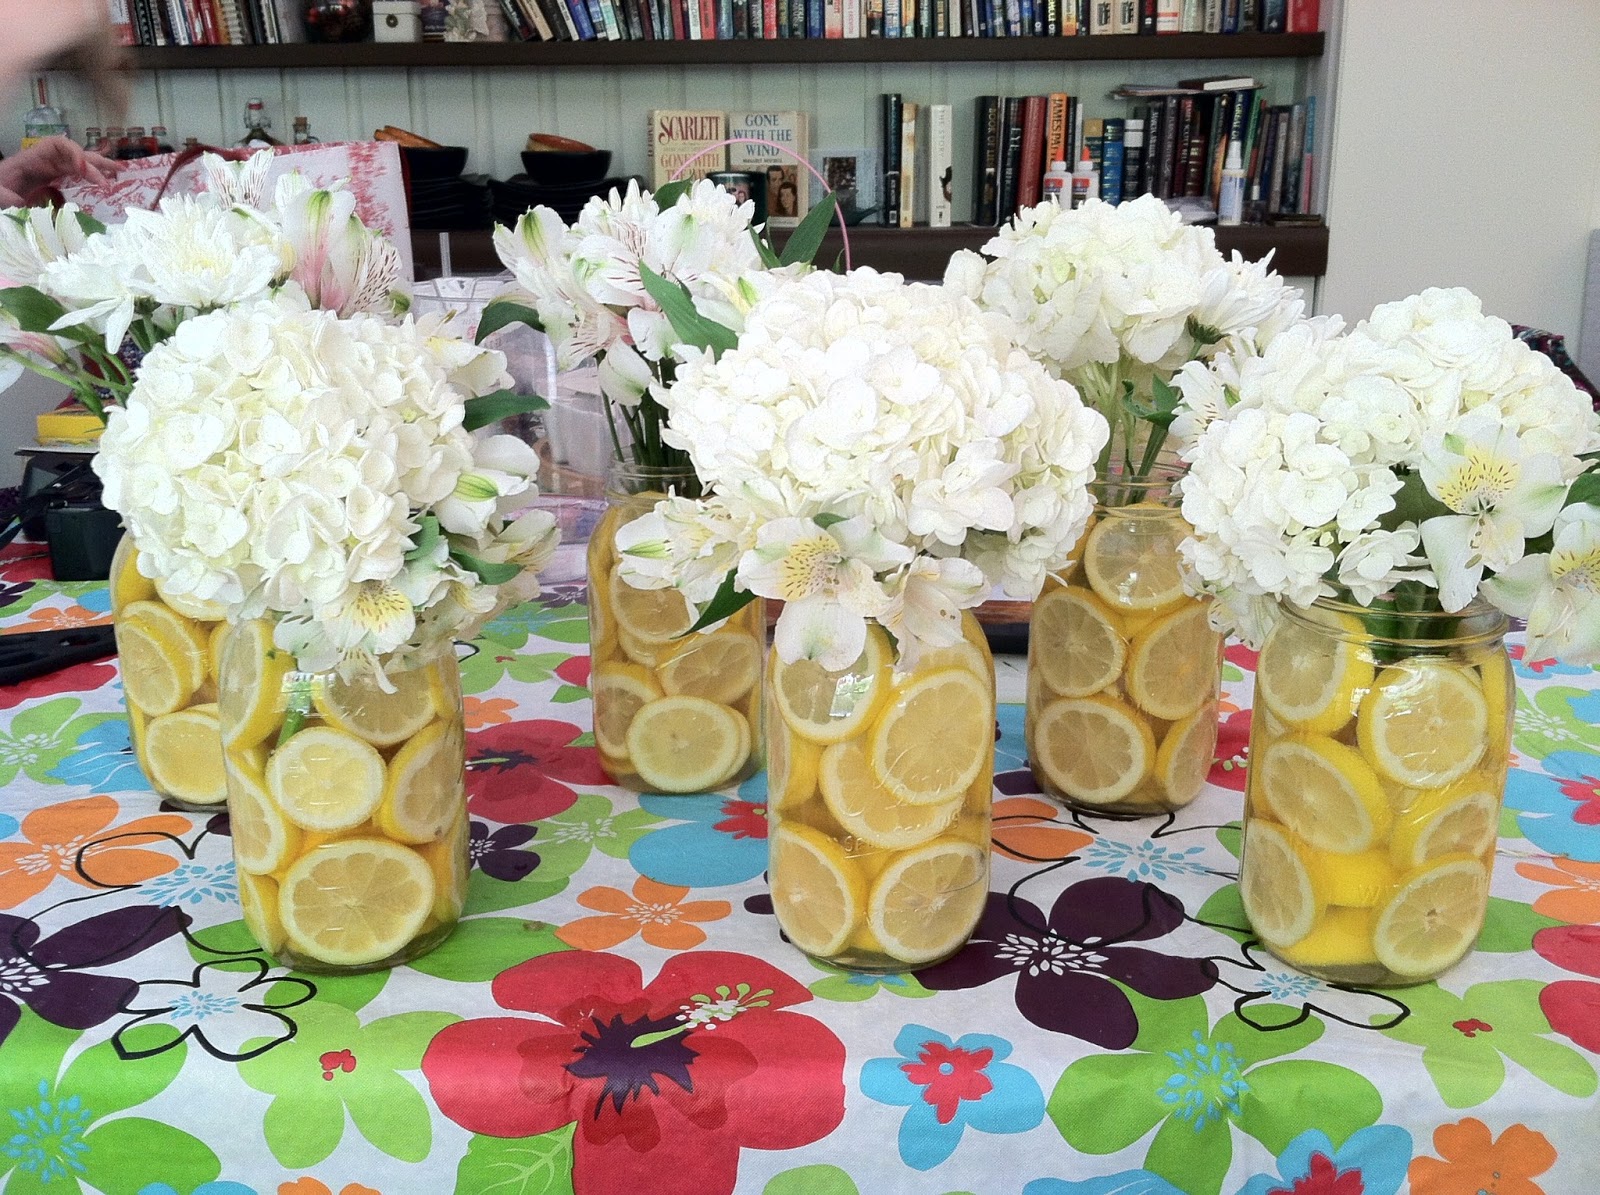
All you need is: mason jars, lemons, flowers and water. Easy. Oh, and a long-handled wooden spoon and some kitchen shears to trim your flower stems.

Start by slicing your lemons. I did kind of thicker-ish slices, because I figured if they were too thin and wilty-like, they wouldn't stand up as well against the jar. Also, don't slice too far to the end of it, as you want to leave the ends (or "butts" as I was calling them) to use as well. I was able to get about four slices per lemon, with leaving a good size butt from each end still.
Then begin by dropping in your first lemon slice down the inside of the jar, right up next to the glass. You can get about three of them down in there before they start falling over. Then, use one of the butts and place it flat side down on the bottom, between the standing slices. Then you can add in your fourth slice, which should form a little square and just about encircle the whole jar. Now comes the trickier part...
From here on out, you have to just kind of roll with it, and figure out the best way for you and your lemons... Begin wedging the butt pieces up against that center butt and the other slices, in order to keep the slices pressed up against the outside of the jar. I found that you could place the sliced side facing outwards, and the butt end facing the center, and it worked well and still looked nice. I used on long-handled spoon to push the lemons around and get them in place, and to help hold them steady. (It's hard to fit your hand way down in there!)
Once you think you have those bottom four firmly in place, you can begin adding the next "level" on top of them. Continue using more and more butt pieces to wedge in the center of the jar so that the jar is basically completely full of lemons. You can even leave some of the smaller lemons whole and put them in the center as well. (You will be cutting the flower stems super short, so don't worry about leaving space to fit the flowers down to the bottom of the jar.)
Once you reach the mouth of the jar, you should probably just go ahead and wedge in another butt piece, in order to keep everything good and pressed against the glass, just in case. Then you can pour in the water. Pour it almost completely up to the top of the jar! Then begin trimming your flowers. We wanted ours to be just poking out of the jar, with not much stem, so we cut them pretty short. Also, we kept the leaves and greenery to a bare minimum and ripped off some of the leaves too. Then just arrange your flowers how you like them in the jar! We used a mix of hydrangea, alstroemeria and dasies, all of which were white.
And now you should have one cute jar completely done! Continue on with however many more you want to do. You can do about two and half jars with about one bag of lemons, so keep that in mind. And the amount of flowers you need is really your preference, but we used seven small-ish bouquets from Publix for our six mason jars.

And just for convenience, here's a quicker run down of the instructions:
1. Gather jars, lemons, flowers, water, long-handled spoon, kitchen shears.
2. Slice lemons thickly, leaving ends or "butts" of lemons as well
3. Place lemons in bottom of jar, using long-handled spoon to push around and hold in place
4. Use butts of lemons to wedge between so that the slices stand up against the jar
5. Continue layering lemons up the jar, placing more butt pieces as often as needed to hold in place
6. Fill jar with water
7. Trim flower stems relatively short, and arrange in the jar
8. Enjoy your precious little centerpieces!

I hope that those instructions made sense to y'all! I tried my best at least to describe things, even without step-by-step photographs that would have probably been helpful! I had the idea to write this tutorial after I had already completed the project, so I didn't think about it in time to take additional pictures of each part of the process. Oh well. Hopefully this made sense anyways, and you guys can try this out on your own!
Another variation of this that I think would be super cute as well would be to use limes instead of lemons, and use blue and/or purple hydrangea's and whatever else, in order to mix up the color scheme! (And that matches my wedding color scheme, so maybe I'll use that idea for something for my own wedding sometime!!) My centerpieces didn't turn out absolutely perfect or anything, but they turned out great to me, and I loved them! And so did my sister, which was important! And so did all of the shower guests. :) So I'd say it was a successful Pinterest project! And now I get to move another thing to my "Already Accomplished via Pinterest" board! Yay me!
 |
| Found HERE on Pinterest |
All you need is: mason jars, lemons, flowers and water. Easy. Oh, and a long-handled wooden spoon and some kitchen shears to trim your flower stems.

Start by slicing your lemons. I did kind of thicker-ish slices, because I figured if they were too thin and wilty-like, they wouldn't stand up as well against the jar. Also, don't slice too far to the end of it, as you want to leave the ends (or "butts" as I was calling them) to use as well. I was able to get about four slices per lemon, with leaving a good size butt from each end still.
Then begin by dropping in your first lemon slice down the inside of the jar, right up next to the glass. You can get about three of them down in there before they start falling over. Then, use one of the butts and place it flat side down on the bottom, between the standing slices. Then you can add in your fourth slice, which should form a little square and just about encircle the whole jar. Now comes the trickier part...
From here on out, you have to just kind of roll with it, and figure out the best way for you and your lemons... Begin wedging the butt pieces up against that center butt and the other slices, in order to keep the slices pressed up against the outside of the jar. I found that you could place the sliced side facing outwards, and the butt end facing the center, and it worked well and still looked nice. I used on long-handled spoon to push the lemons around and get them in place, and to help hold them steady. (It's hard to fit your hand way down in there!)
Once you think you have those bottom four firmly in place, you can begin adding the next "level" on top of them. Continue using more and more butt pieces to wedge in the center of the jar so that the jar is basically completely full of lemons. You can even leave some of the smaller lemons whole and put them in the center as well. (You will be cutting the flower stems super short, so don't worry about leaving space to fit the flowers down to the bottom of the jar.)
Once you reach the mouth of the jar, you should probably just go ahead and wedge in another butt piece, in order to keep everything good and pressed against the glass, just in case. Then you can pour in the water. Pour it almost completely up to the top of the jar! Then begin trimming your flowers. We wanted ours to be just poking out of the jar, with not much stem, so we cut them pretty short. Also, we kept the leaves and greenery to a bare minimum and ripped off some of the leaves too. Then just arrange your flowers how you like them in the jar! We used a mix of hydrangea, alstroemeria and dasies, all of which were white.
And now you should have one cute jar completely done! Continue on with however many more you want to do. You can do about two and half jars with about one bag of lemons, so keep that in mind. And the amount of flowers you need is really your preference, but we used seven small-ish bouquets from Publix for our six mason jars.
And just for convenience, here's a quicker run down of the instructions:
1. Gather jars, lemons, flowers, water, long-handled spoon, kitchen shears.
2. Slice lemons thickly, leaving ends or "butts" of lemons as well
3. Place lemons in bottom of jar, using long-handled spoon to push around and hold in place
4. Use butts of lemons to wedge between so that the slices stand up against the jar
5. Continue layering lemons up the jar, placing more butt pieces as often as needed to hold in place
6. Fill jar with water
7. Trim flower stems relatively short, and arrange in the jar
8. Enjoy your precious little centerpieces!

I hope that those instructions made sense to y'all! I tried my best at least to describe things, even without step-by-step photographs that would have probably been helpful! I had the idea to write this tutorial after I had already completed the project, so I didn't think about it in time to take additional pictures of each part of the process. Oh well. Hopefully this made sense anyways, and you guys can try this out on your own!
Another variation of this that I think would be super cute as well would be to use limes instead of lemons, and use blue and/or purple hydrangea's and whatever else, in order to mix up the color scheme! (And that matches my wedding color scheme, so maybe I'll use that idea for something for my own wedding sometime!!) My centerpieces didn't turn out absolutely perfect or anything, but they turned out great to me, and I loved them! And so did my sister, which was important! And so did all of the shower guests. :) So I'd say it was a successful Pinterest project! And now I get to move another thing to my "Already Accomplished via Pinterest" board! Yay me!
17 comments:
These are adorable. Great job!
Stop by some time http://styledlikearockstar.blogspot.com
ahhh thanks for the tutorial! I love these!
These are adorable!!
In love! I'm going to do this for my Mom's birthday! :)
These are totally adorable! I am so taking your Alread Accomplished Board Idea, it's great to see what you have achieved :)
That is so pretty and I am sure smells amazing!
these are gorgeous! I bet limes would be pretty too!
xoxo
What a great idea!
Wow - that looks fantastic! Definitely going to do that next time I'm hosting a party!
Such a great idea! Love it!
I love the combination of fresh fruit and flowers! And yours look way better than the inspiration photos, I prefer your flower choices :)
Gorgeous! I especially love your limes and blue hydrangea suggestion. These would be perfect for a DIY wedding.
So cute! And relatively easy and inexpensive. Great idea! :)
seriously LOOOOOOOOVE these, like LOOOVE!
these would have been perfect for our centerpieces
I wanna make one for my kitchen table, I am just so in love.
great job lady!
I WISH I would have looked at Pinterest before my shower and wedding. These are beautiful..
Excuse me while I go pout.
I've always wondered how they made these! Thanks! How long do they last for?
These are adorable!
Post a Comment